27 November 2017

Easy UnInstall Sitecore 9

As being Sitecore developer, I do Sitecore Installations often. Earlier when we used to Install, it was relatively easy(1, 2, 3) to un-install Sitecore. Though it was never too easy, but still we can remove website by taking care of IIS node & couple of databases in local machine to get rid of old or corrupted Sitecore Instalations.

Recently Sitecore launched new Instalation experience, called it SIF(Sitecore Instalation Framework), many(Kam, Toby) of our MVP colleagues has already blogged about it on how to quickly learn & do it yourself. But with this new way, it introduces many moving pieces. So now it contains SSL Certificates, Solr Cores, Windows Services, multiple IIS websites and these can be less or more depend upon the type of Instalation(Topologies) you choose.

During my own learning, I failed with Sitecore 9 Instalations & end up having these zombies pieces like Certs, DB, Solr Core etc., I see this problem is not only with me, Kam did take a shot to it.

Well, I am trying to bring my own solution for same problem. Following is to summarise my solution in quick points:

  • Create Uniform PowerShell Script(Cmdlet) for Instalation.
    • I take this script straight from Sitecore Instalation Manual & made little modifications.
  • As part of this instalation script generate 'AntiInstance' file in JSON format.
    • As part of this modification I write code to generate this JSON file.
  • With help of 'AntiInstance' file & another Powershell script Un-Install the Sitecore Instance.
    • This should be run & forget as a forceful removal.
Key here are two PowerShell files which are still in WIP, you can find source code here, which I plan to complete over in nex few weekends.

Following are quick steps to Install & then Un-Install Sitecore, Here deliberately i will fail the Installation to mock incomplete Installations. 
  • Dump all files in one folder(as shown in Figure 1.1), for required topology, in this example I used xp0.
    • This folder should includes license file & two Powershell files. Powershell files you should get from GitHub.
Figure 1.1
  • Make sure that you use SitecoreInstall-Better.ps1 file for Instalation while updating all parameters stated at start of file(as shown in Figure 1.2).
    • Offcourse here, I assumed that you already have all pre-requisite(for example Solr on SSL) to Install Sitecore(Otherwise follow blogs stated earlier).
Figure 1.2
  • Install Sitecore while firing up above file after due changes. 
Figure 1.3
  • This should  result in In-Complete Installation.
Figure 1.4
  • Now let's Un-Install this Sitecore Instalation, while using Un-InstallSitecore.ps1 file. It will confirm before deleting Website root folders, to be quick pass A for 'Accept All'.
Figure 1.5
  • It should clear all mess which earlier Instalation script it left, for example certificate installed earlier deleted through this script as shown in Figure 1.6 & 1.7
Figure 1.6

Figure 1.7

Again this is not yet production ready & take it at your own risk. I will try to complete it for xp0 topology and will seek feedback to take it further, if this is right way to uninstall for actual adoption.

Let me know what you think about this, especially Kam.

09 November 2017

Install Tyk Gateway

While creating NodeJS based services for one of the project, I realise we need an good open source API Gateway.

By the way, what is API gateway ?
"An API Gateway is a server that is the single entry point into the system. It is similar to the Facade pattern from object‑oriented design. The API Gateway encapsulates the internal system architecture and provides an API that is tailored to each client. It might have other responsibilities such as authentication, monitoring, load balancing, caching, request shaping and management, and static response handling" - Quoted from here.

But you must be thinking, go and use AWS or Azure for hosting Services and they all come up with API mangement or gateway features. Our issue was PII data which we only host with trusted datacenter partner. So we need on-premise API Gateway which can scale if required & atleast free for initial instalation on production to tryout how it goes. 

So we zoomed on Tyk after couple of options. We like it because of simplicty of its instalation, interface & easy to follow documentation. 

In our case, Tyk Gateway will take inbound requests, run them through a set of middleware components which apply transforms and any other service-specific operations, and then proxy the request out again to the origin, intercepting the response, running a set of response middleware and then returning

Sharing my quick instalation script for Tyk Gateway on RHEL, it may help somebody else. Script assume it is clean & fresh RHEL instance to which you have Sudo access, still in some place you may need to change or add additional commands as per your context.

But  before starting with Gateway script following is script to setup machine quick


Machine Setup Commands
--------------------
yum upgrade
yum install -y NetworkManager-tui nano wget
#use ip addr command to see the current network interface name then set it up to be used by network manager
nano /etc/sysconfig/network-scripts/ifcfg-ens33
#change the address to below    
nmtui edit ens33
#add the google DNS & local dns
nano /etc/resolv.conf
#add the local hostname
nano /etc/hosts
127.0.0.1   localhost localhost.localdomain localhost4 localhost4.localdomain4 dev.apigateway.com
::1         localhost localhost.localdomain localhost6 localhost6.localdomain6
192.168.171.130 dev.apigateway.com
192.168.171.130 portal.apigateway.com
#restart the network service
systemctl restart network.service
ping dev.apigateway.com
ping portal.apigateway.com
sudo firewall-cmd --zone=public --add-port=27017/tcp --permanent
sudo firewall-cmd --reload
Now following is Gateway instalation code..
STEP-A - Gateway Instalation
--------------------
TYK-Gateway Installation
--------------------
Step-1
------
sudo firewall-cmd --zone=public --add-port=8080/tcp --permanent
sudo firewall-cmd --reload
sudo yum install pygpgme yum-utils wget
Step-2
------
nano /etc/yum.repos.d/tyk_tyk-gateway.repo
#Copy & Paste below
[tyk_tyk-gateway]
name=tyk_tyk-gateway
baseurl=https://packagecloud.io/tyk/tyk-gateway/el/7/$basearch
repo_gpgcheck=1
enabled=1
gpgkey=http://keyserver.tyk.io/tyk.io.rpm.signing.key
   https://packagecloud.io/gpg.key
sslverify=1
sslcacert=/etc/pki/tls/certs/ca-bundle.crt

[tyk_tyk-gateway-source]
name=tyk_tyk-gateway-source
baseurl=https://packagecloud.io/tyk/tyk-gateway/el/7/SRPMS
repo_gpgcheck=1
enabled=1
gpgkey=http://keyserver.tyk.io/tyk.io.rpm.signing.key
   https://packagecloud.io/gpg.key
sslverify=1
sslcacert=/etc/pki/tls/certs/ca-bundle.crt

Step-3
------
#Make sure you refer latest epel version for example i changed it to epel 7-8 to 7-10
cd GatewayInstall
wget http://dl.fedoraproject.org/pub/epel/7/x86_64/e/epel-release-7-10.noarch.rpm
sudo rpm -ivh epel-release-7-10.noarch.rpm
sudo yum -q makecache -y --disablerepo='*' --enablerepo='tyk_tyk-gateway' 
--enablerepo=epel info zabbix
Step-4
------
##In order to allow your custom port from default linux firewalls
sudo firewall-cmd --zone=public --add-port=6379/tcp --permanent
sudo firewall-cmd --reload
sudo yum install -y redis tyk-gateway
sudo /opt/tyk-gateway/install/setup.sh --listenport=8080 --redishost=localhost 
--redisport=6379 --domain=""
Step-5
------
sudo service redis start
----------------------


STEP-B - Dashboard Instalation
--------------------
TYK-Dashboard Installation
--------------------
Step-1
------
#ignore if already done
yum install pygpgme yum-utils wget
Step-2
------
nano /etc/yum.repos.d/tyk_tyk-dashboard.repo
#Copy & Paste below
[tyk_tyk-dashboard]
name=tyk_tyk-dashboard
baseurl=https://packagecloud.io/tyk/tyk-dashboard/el/7/$basearch
repo_gpgcheck=1
enabled=1
gpgkey=http://keyserver.tyk.io/tyk.io.rpm.signing.key
   https://packagecloud.io/gpg.key
sslverify=1
sslcacert=/etc/pki/tls/certs/ca-bundle.crt

[tyk_tyk-dashboard-source]
name=tyk_tyk-dashboard-source
baseurl=https://packagecloud.io/tyk/tyk-dashboard/el/7/SRPMS
repo_gpgcheck=1
enabled=1
gpgkey=http://keyserver.tyk.io/tyk.io.rpm.signing.key
   https://packagecloud.io/gpg.key
sslverify=1
sslcacert=/etc/pki/tls/certs/ca-bundle.crt

Step-4
------
nano /etc/yum.repos.d/mongodb-org-3.0.repo
#Copy & Paste below
[mongodb-org-3.0]
name=MongoDB Repository
baseurl=https://repo.mongodb.org/yum/redhat/$releasever/mongodb-org/3.0/x86_64/
gpgcheck=0
enabled=1

Step-5
------
sudo yum -q makecache -y --disablerepo='*' --enablerepo='tyk_tyk-dashboard' info zabbix

Step-6
------
sudo yum install -y mongodb-org tyk-dashboard

Step-7
------
sudo firewall-cmd --zone=public --add-port=3000/tcp --permanent
sudo firewall-cmd --reload
sudo /opt/tyk-dashboard/install/setup.sh --listenport=3000 --redishost=localhost
--redisport=6379 --mongo=mongodb://127.0.0.1/tyk_analytics --tyk_api_hostname=$HOSTNAME
--tyk_node_hostname=http://localhost --tyk_node_port=8080 --portal_root=/portal
--domain="apigateway.com"
sudo service tyk-dashboard start
#enter the license by browsing the url & restart the service
sudo service tyk-dashboard restart 
#Configuring Tyk Gateway with Dashboard
sudo /opt/tyk-gateway/install/setup.sh --dashboard=1 --listenport=8080 
--redishost=localhost --redisport=6379
#Boostrap the Dashboard
sudo /opt/tyk-dashboard/install/bootstrap.sh apigateway.com:3000

TYK-PUMP Installation
---------------------
Step-1
------
nano /etc/yum.repos.d/tyk_tyk-pump.repo
#copy paste below
[tyk_tyk-pump]
name=tyk_tyk-pump
baseurl=https://packagecloud.io/tyk/tyk-pump/el/7/$basearch
repo_gpgcheck=1
enabled=1
gpgkey=http://keyserver.tyk.io/tyk.io.rpm.signing.key
   https://packagecloud.io/gpg.key
sslverify=1
sslcacert=/etc/pki/tls/certs/ca-bundle.crt

[tyk_tyk-pump-source]
name=tyk_tyk-pump-source
baseurl=https://packagecloud.io/tyk/tyk-pump/el/7/SRPMS
repo_gpgcheck=1
enabled=1
gpgkey=http://keyserver.tyk.io/tyk.io.rpm.signing.key
   https://packagecloud.io/gpg.key
sslverify=1
sslcacert=/etc/pki/tls/certs/ca-bundle.crt

Step-2
------
sudo yum -q makecache -y --disablerepo='*' --enablerepo='tyk_tyk-pump' info zabbix
sudo yum install -y tyk-pump

Step-3
------
sudo /opt/tyk-pump/install/setup.sh --redishost=localhost --redisport=6379
--mongo=mongodb://127.0.0.1/tyk_analytics
sudo service tyk-pump start
Following are quick service commands

Service Start Commands for gateway
-------------------
service mongod stop
service redis stop
service tyk-gateway stop
service tyk-dashboard stop
service tyk-pump stop

service mongod restart
service redis restart
service tyk-gateway restart
service tyk-dashboard restart
service tyk-pump restart
service mongod start
service redis start
service tyk-gateway start
service tyk-dashboard start
service tyk-pump start
-------------------
After installing Mongo as default, i realised that this will not scale as we analytics portion of gateway will quickly eat GB's, so need to shift mongo data directory to its dedicated drive. While good thing with this gateway is even if mongo server is choked, API gateway still continue to work, which saved the day.
#Better to change dbpath so that mongo don't run under default directory, assume here
new dbpath to be is /data02/mongodb/
#http://blog.carl.pro/2016/07/installing-mongodb-on-rhel-defining-a-custom-data-directory
sudo service mongod stop
cd /var/lib/mongodb
cp -rf mongodb /data02/mongodb/
cd /data02/
sudo mkdir /data02/mongodb/
cd /data02/mongodb/
sudo chown -R mongod:mongod  /data02/mongodb/
sudo chmod -R 700 mongodb/
#Change dbpath to above example directory /data02/mongodb/
nano /etc/mongod.conf
#if SELinux enabled
sestatus
yum install policycoreutils-python
semanage fcontext -a -t mongod_var_lib_t '/data02/mongodb/'
restorecon -v '/data02/mongodb/'
semanage port -a -t mongod_port_t -p tcp 27017
sudo service mongod start
# test if mongodb user can access new location:
sudo -u mongodb -s cd /data02/mongodb/
Will write more on how we develop our NodeJS service & share our learning.

07 November 2017

Sitecore 9 - A Beginning of New Era


“Everything and anything you want to do, you can do in Las Vegas.”
– Drew Carey

Well this is the experience I took from last Sitecore Symposium 2017, as Sitecore embraces freedom & flexibility to let Brands drive their digital destiny.

Before I talk about its best new features and uses, let me present you with key facts as they were:
  • Sitecore’s core Competency is content author experience, which has not been revamped or rethought from new perspective, it's been years since Sitecore 5 series launched Content Editor Shell. Sitecore 6 brought inline content editing using Page Editor. Till Sitecore 9, these user interfaces don’t change beyond new icons/glossy UI & few feature addons rolled out during these years. But how about new User Experience (UX)?
  • In ever growing world of distributed computing in Cloud, it’s Sitecore that is becoming more of centralized big monolithic piece of web software. So Sitecore had created its own barriers, due to that enterprises are not able to adopt features like Personalization when they need it & end up achieving it through tools like Optimizely. So how about some flexibility & Openness?
  • Barriers to code/web development are decreasing rapidly because of Web tooling is changing at an extremely rapid pace, “JavaScript var is dead? We should use ES2015 let and const now”. Next set of UI developers are coming from world of Angular, React etc. Such developers don’t want to learn .NET to develop good looking website, when they know HTML, CSS & JavaScript. So how about freedom to develop using what web developers love most?

Programmer Optimistic Quote Sitecore since last 1 year invested in enterprise data connectivity, making its operation experience easy & focuses on quality and continue to address concerns what industry & its leaders were raising. Though this journey is just started and Sitecore 9 is a step in right direction. So, let me cover quick headlines from Sitecore Symposium 2017, which attempt to address these concerns. Sitecore 9 is launched in this event. I am being one of the few MVPs was lucky to get certified in Sitecore 9 during the event. Though general certification event is available now. For larger adoption first update will launch by JFM quarter of 2018 or early spring. This gives enterprises enough time to study Sitecore 9 & fix issues they may encounter during 9 update processes.
Figure 1.0
“Since I am programmer, optimistic by nature.”

Sitecore 9 Core features

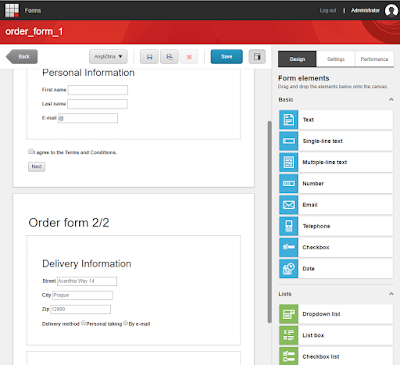
Sitecore Web Form 9
Figure 1.1

Sitecore 9 offers new Web Forms which allow content authors to create data collection or process forms in easy & intuitive way.

Sitecore also introduced SQL 2017 support for its Consumer Engagement Platform, which will enable enterprises to adopt quickly.
List of new features as follows:
  • Dynamic Placeholder support
  • Rule based configuration  support & restructured configuration
  • PowerShell based  Sitecore Installation Framework
  • Federated Authentication so we can do OWIN.
  • OData Item Service: Include support for  CORS .
  • New Upgrade Service
  • Better Publishing Service
  • Secure by default: Now Sitecore services should be configured using SSL certificates – include IIS, SOLR and xConnect.
  • R.I.P. sheer UI ribbon, so old Modules may not work which uses custom buttons/commands on ribbon.
  • SPEAK 3.0: Sitecore UI Framework to build Sitecore application going forward, usually used to customize Sitecore. Key here, it is based on Angular rather proprietary UI framework.
  • Evolved Tech Stack Support:
  • Windows Server 2016 and Windows 10
  • SQL Server 2016 and SQL Azure
  • .Net Frameworks 4.6.2
  • xDB support for SQL Server 2016 & Cosmos DB along with Mongo DB
  • No more Lucene support on production now Solr & Azure Search are first class search citizens.

Sitecore announced new Content authoring experience namely   Project Horizon , which promise to bake in-place AI assistance & Analytics based suggestions, futuristic.

We MVPs are skeptical about this announcement because Sitecore has started cooking new product without inviting us to party. But I think this cynicism is baseless and give Sitecore time till its first preview out sometime next year

xConnect

XConnect, a long-awaited feature known from last 1.5 years, is an initiative which makes Sitecore in general more accessible to enterprises for their applications & data.

Technically speaking, xConnect is the service layer that sits between xDB and any client, device or external service that wants to read, write or search xDB data making it easy to retrieve and consume analytics data in an easy and flexible way via the user-friendly APIs. 

Currently xConnect is comprised of two services:
Figure 1.2

Azure PaaS (Finally 100%)

With Sitecore 9.0 we don’t need to host our own Managed Mongo Service or enterprise Cloud offering of Mongo such as Atlas etc. With  Azure Toolkit 2.0  one can natively deploy the Sitecore application to  Azure App Service. This enables businesses to bring their Sitecore hosting costs down thus making operations team leaner & overall running Sitecore solution cheaper. The latest Sitecore Azure Toolkit is  here.
Figure 1.3


UI Freedom (JSS -  JavaScript )

We all facing the industry’s push for Headless CMS, but won’t iterate on what it is, but will focus on why enterprises are betting on it?

Objective Content Vs Subjective Treatment: In Sitecore when we defined content earlier, we baked in how it should look because CMS offered valuable tools to design presentation, at one point this was good strategy. Because earlier we were limited to Web or Mobile Channels, where HTML could be consumed. But what if Enterprises were betting that they should be able to use same content elsewhere where presentation of content may have nothing to do with HTML itself. Enterprises realized, that they need either further treatment of same content to re-use or re-write it in another system.

Solution is to define content in simplest form or objective content. While content may have additional attribute telling how it should look or place itself at provided channel as additional meta data. So that developer of presentation for device (engagement channel like web browser or Iot enabled Refrigerator Screen) could consume that content

Accessibility of Content: For content to become objective we need to make sure it is accessible. Accessibility is possible only if content is available in Open Data Specification & could be queried with ease like with help of GraphQL. Apart from the format, the location of content is also important (For eg., most of headless CMS out there are running as SaaS).

So Sitecore with advent of JSS & Project Zenith is taking serious shot at both problems. While there is very less information about Zenith at present except that it would be an answer to Headless CMS - urge from industry.
JSS and OData and Sitecore Services Client Comparision
On the other hand, JSS is a short-term answer to decouple presentation from Sitecore CMS which gives freedom of choosing frontend framework eventually. While myself is considering Sitecore as CMS to create React based website. Will further use Static Site Generation framework to cash out on existing Sitecore investment our client has in comparison to buying new subscription plan and training them on new a tool.

As technically, JSS is a complete SDK for JavaScript developers allowing them to build full-fledged modern solutions using Sitecore and JavaScript, and being completely disconnected during development and deploy to any platform in a headless configuration with full Experience Platform capability preserved.
Figure 1.4

I hope a new era had begun for Sitecore where they start paying attention to industry trends like Micro Services (folks know it as Service Oriented Architecture) approach, Open Data Specifications, Open Platform Specification. Sitecore is learning from Microsoft where they embrace Linux & other open world standards.

Lastly, I hope I will be back soon blogging with results for Sitecore website running on Netlify chewing content from Sitecore’s JSS.